Active Directory: From Chaos To control

Before knowing what is active directory, answer this question, what is directory??

What is Directory?

Directory basically means a hierarchical arrangement of different kind of entities. Entities can be anything like document, books, access controls, address book or dictionary.

What is Active directory?

Active directory is like a digital directory made for computers and other devices to be managed in a network. Active Directory (AD) is a Microsoft technology which is a primary feature of windows server and Operating system (OS). AD enables centralized management, authentication, authorization and access control mechanisms.

Why making directories are important?

Making directories is like arranging your space properly along with proper rights and access mechanisms.

Directories are important because it helps in:

  1. Organizing the information or documents. It keeps digital directories stored in a logical manner along with easy access.
  2. Directories makes our work efficient and quicker.
  3. Security measures like access controls and authentication and authorization becomes easy to embed in well-organized directories.
  4. Scalability increases. Scalability means ease of adding new data or files into the directory.
  5. Directories allows ease integration between systems and applications. Protocols like LDAP (Lightweight Directory Access Protocol) {we will see what is that in some time} & APIs {Application Programming Interface} enables interoperability between software platforms, allowing them to exchange information

Architecture of Active Directory

As we saw above, that Active directory is a hierarchical structure made for efficient usage and organization of entities.

Active directory consists of different components. Some of the major components are:

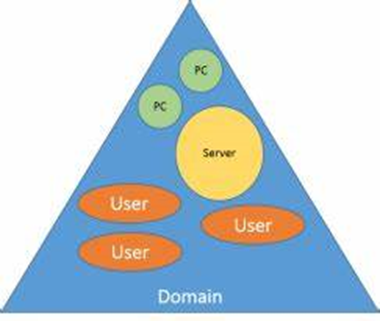
1. Domains: This is the fundamental unit of whole logical organization. It represents a group of network objects (computers, users, devices) that share a common directory database, security policies, and trust relationships. Each domain has its own unique name and can be managed independently.

2. Domain Controllers (DCs): These are the servers that store a copy of AD Database & authenticate users & computers within the domain. They sync with the changes which happens in AD database at the same time to ensure consistency and fault tolerance.

3. Active Directory Database: This is the huge database which contains every information like objects, users, groups, computers, Ous etc along with different schemas and structures.

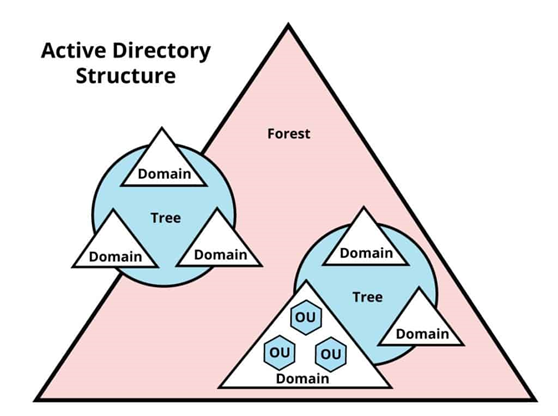
4. Tree & child domains: Think this as a family tree, which we used to make in pre-primary sections. It is the hierarchical structure starting from the main node to child nodes.

5. Forest: It is the collection of more than 1 trees/domains which share a common schema, configuration and global catalog.

6. Organizational Units (OUs): These are like the class CR’s. They manage and handle objects within a specific assigned domain. They add group policies, assign admin tasks, simplify directory management etc.

7. Global Catalog (GC): This is responsible for having partial replica of all the objects from each domain within the forest. Think of this like you are a student and you are searching for relevant course in a specific college. Then you will see the global catalogue and select a specific course.

Services of Active Directory

AD DS — Active directory Domain Services — These are the core services provided by Microsoft Windows OS. It has different features but basically its responsible for organizing and controlling access to network resources in Windows domain environment.

Basic services provided by AD DS are:

  1. Authentication: It means verification of the identity of user or device. Example entering the password for account login.
  2. Authorization: It means level of authority or level of access control. Example you are allowed to use lab computers in school but you aren’t allowed to use teacher’s side computer from the staff room.
  3. Directory Services: This is a store room which stores and organizes information about users, groups, computers and other network resources in centralized database.
  4. Certificate service: It keeps an eye on managing, revoking and issues related to the certificates used for authentication, encryption and digital signatures.
  5. DNS Integration: AD DS facilitates the service of DNS (name resolution services). It converts the IP address into domain name and vice versa.

Some Key protocols associated with AD DS are:

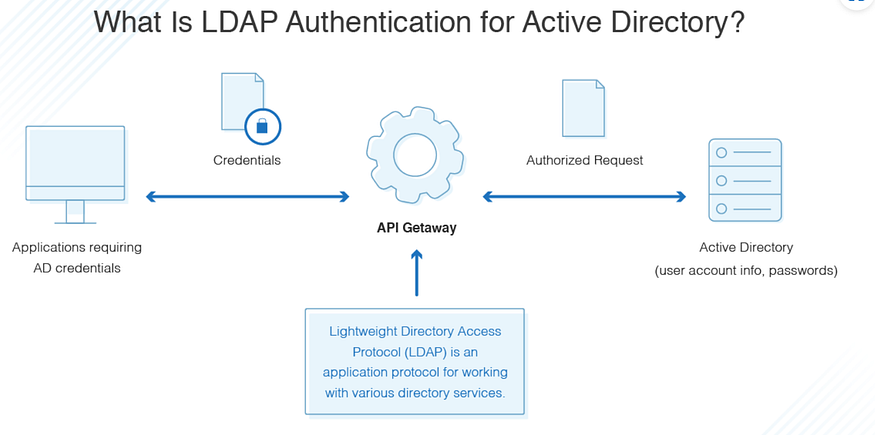
1. LDAP (Lightweight Directory Access Protocol): This protocol is easy to understand and implement. It allows clients to search, add, modify, and delete directory objects like users, groups, computers etc. It works over TCP/IP and it is the primary means of communication between ADDS clients and domain controllers.

2. Kerberos Authentication: As the name speaks, it is used for secure authentication between clients and domain controllers (DCs). It works over TCP & UDP. The main components of Kerberos are Authentication Server, Database and TGS (Ticket Granting Server).

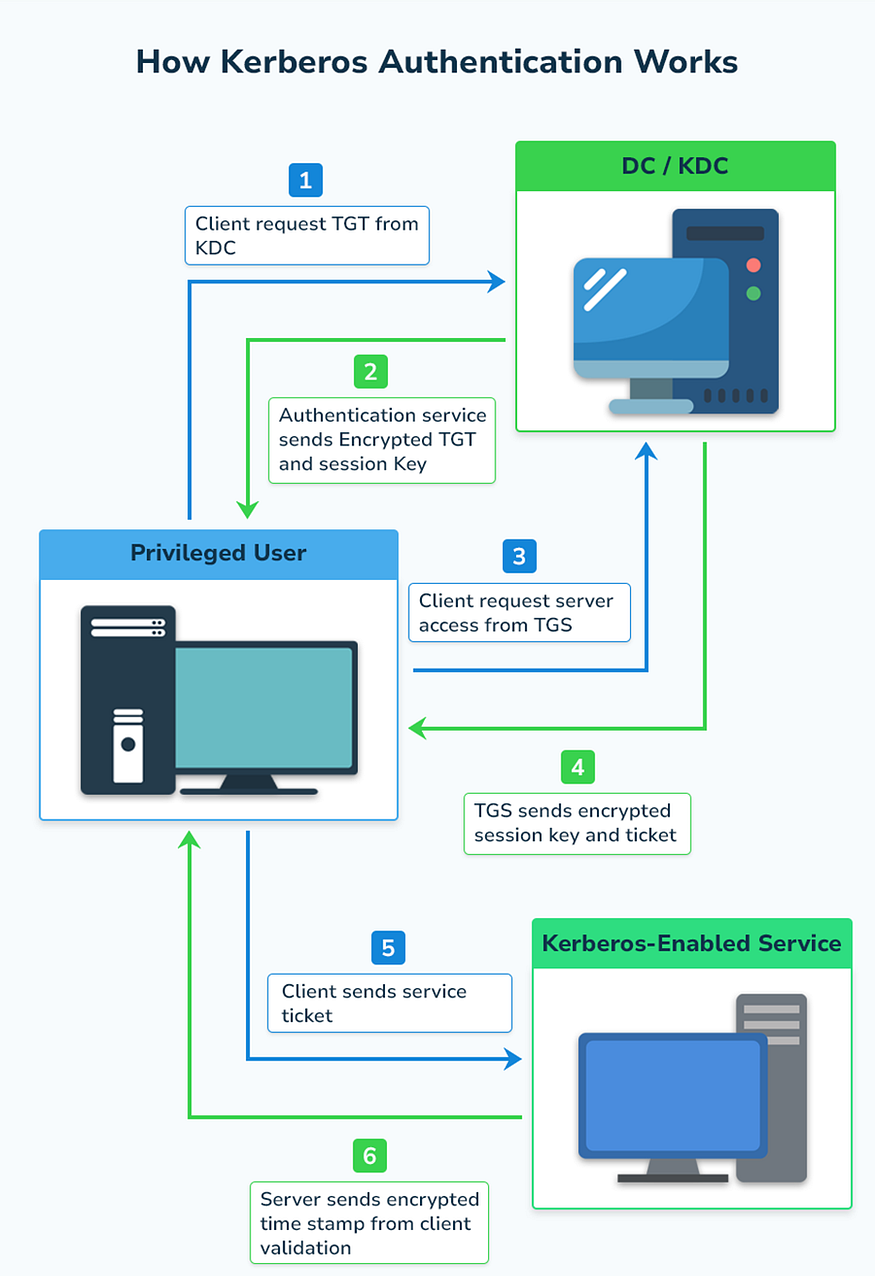
Process of Kerberos:

a. User sends log in request (ticket-granting request). This request is sent to KDC (Key Distribution center).

b. Authentication server uses the verification method for user using database. If the user gets verified then he/she gets the ticket-granting-ticket (TGT) and session key. If not, then the log in request fails. TGT and session key are encrypted using user’s password.

c. Then comes the role of TGS that is Ticket Granting server. TGS verifies the TGT and issues a service ticket for requested service. The service ticket is encrypted using the service’s secret key, not the user’s password.

d. The target service then decrypts the service ticket using its own secret key and verifies the user’s identity. If the verification is successful, the user is granted access to requested service.

3. NTLM (New Technology LAN Manager): It is used as single sign on processes (SSO). When a user tries to access a network, server sends a challenge (16-byte random numbers), which is a random string of characters. User encrypts the challenge using a hash of user’s password and sends it back to server. Server sends this to DC and DC retrieves the user’s password from the database and encrypts the challenge. Then DC compares the encrypted challenge & client response. If both matches then authentication is successful and access is granted.

4. DNS (Domain Name System): This is important for AD DS operation. It resolves domain names to IP address & vice versa. Check this blog for more understanding on DNS.

5. Kerberos & LDAP over SSL/TLS: LDAPS & Kerberos authentication over SSL/TLS becomes more secure which increases the confidentiality and integrity for directory operations.

Advantages Of AD:

  1. Centralized Management — Managing everything under a single domain is known as centralized management. AD manages users, computers, groups & other networks centrally.
  2. Single Sign-On — Users can log in to different applications or resources using a single domain credentials.
  3. Integration with Microsoft services — AD is integrated with different Microsoft services like Exchange Server, SharePoint & office 365 which increases productivity.
  4. Group policy management — AD gives the right to enforce policies and configurations in the specific part of network or devices. This enhances security management.
  5. Identity Management — AD allows admins to manage user identities, credentials & access permissions.

Disadvantages Of AD:

  1. Complexity — Implementing and managing AD & AD Domain Services (ADDS) is complex and requires proper in-depth understanding.
  2. Single point of failure- If the main primary domain controller fails then whole directory and services can crash down.
  3. Maintenance Overhead — ADDS requires more efforts to maintain starting from software updates to patching vulnerabilities to uphold performance.
  4. Compatibility — AD is specifically made for windows but if you want to add it in another operating system then it might become challenging.
  5. Cost — AD requires licensing fees and may require additional hardware resources which increases the cost.

Speech to Text to Speech with AI Using Python — a How-To Guide

How to Create a Speech-to-Text-to-Speech Program

Image by Mariia Shalabaieva from unsplash

It’s been exactly a decade since I started attending GeekCon (yes, a geeks’ conference 🙂) — a weekend-long hackathon-makeathon in which all projects must be useless and just-for-fun, and this year there was an exciting twist: all projects were required to incorporate some form of AI.

My group’s project was a speech-to-text-to-speech game, and here’s how it works: the user selects a character to talk to, and then verbally expresses anything they’d like to the character. This spoken input is transcribed and sent to ChatGPT, which responds as if it were the character. The response is then read aloud using text-to-speech technology.

Now that the game is up and running, bringing laughs and fun, I’ve crafted this how-to guide to help you create a similar game on your own. Throughout the article, we’ll also explore the various considerations and decisions we made during the hackathon.

Want to see the full code? Here is the link!

The Program’s Flow

Once the server is running, the user will hear the app “talking”, prompting them to choose the figure they want to talk to and start conversing with their selected character. Each time they want to talk out loud — they should press and hold a key on the keyboard while talking. When they finish talking (and release the key), their recording will be transcribed by Whisper (a speech-to-text model by OpenAI), and the transcription will be sent to ChatGPT for a response. The response will be read out loud using a text-to-speech library, and the user will hear it.

Implementation

Disclaimer

Note: The project was developed on a Windows operating system and incorporates the pyttsx3 library, which lacks compatibility with M1/M2 chips. As pyttsx3 is not supported on Mac, users are advised to explore alternative text-to-speech libraries that are compatible with macOS environments.

Openai Integration

I utilized two OpenAI models: Whisper, for speech-to-text transcription, and the ChatGPT API for generating responses based on the user’s input to their selected figure. While doing so costs money, the pricing model is very cheap, and personally, my bill is still under $1 for all my usage. To get started, I made an initial deposit of $5, and to date, I have not exhausted this deposit, and this initial deposit won’t expire until a year from now.
I’m not receiving any payment or benefits from OpenAI for writing this.

Once you get your OpenAI API key — set it as an environment variable to use upon making the API calls. Make sure not to push your key to the codebase or any public location, and not to share it unsafely.

Speech to Text — Create Transcription

The implementation of the speech-to-text feature was achieved using Whisper, an OpenAI model.

Below is the code snippet for the function responsible for transcription:

async def get_transcript(audio_file_path: str, 
text_to_draw_while_waiting: str) -> Optional[str]:
openai.api_key = os.environ.get("OPENAI_API_KEY")
audio_file = open(audio_file_path, "rb")
transcript = None

async def transcribe_audio() -> None:
nonlocal transcript
try:
response = openai.Audio.transcribe(
model="whisper-1", file=audio_file, language="en")
transcript = response.get("text")
except Exception as e:
print(e)

draw_thread = Thread(target=print_text_while_waiting_for_transcription(
text_to_draw_while_waiting))
draw_thread.start()

transcription_task = asyncio.create_task(transcribe_audio())
await transcription_task

if transcript is None:
print("Transcription not available within the specified timeout.")

return transcript

This function is marked as asynchronous (async) since the API call may take some time to return a response, and we await it to ensure that the program doesn’t progress until the response is received.

As you can see, the get_transcript function also invokes the print_text_while_waiting_for_transcription function. Why? Since obtaining the transcription is a time-consuming task, we wanted to keep the user informed that the program is actively processing their request and not stuck or unresponsive. As a result, this text is gradually printed as the user awaits the next step.

String Matching Using FuzzyWuzzy for Text Comparison

After transcribing the speech into text, we either utilized it as is, or attempted to compare it with an existing string.

The comparison use cases were: selecting a figure from a predefined list of options, deciding whether to continue playing or not, and when opting to continue – deciding whether to choose a new figure or stick with the current one.

In such cases, we wanted to compare the user’s spoken input transcription with the options in our lists, and therefore we decided to use the FuzzyWuzzy library for string matching.

This enabled choosing the closest option from the list, as long as the matching score exceeded a predefined threshold.

Here’s a snippet of our function:

def detect_chosen_option_from_transcript(
transcript: str, options: List[str]) -> str:
best_match_score = 0
best_match = ""

for option in options:
score = fuzz.token_set_ratio(transcript.lower(), option.lower())
if score > best_match_score:
best_match_score = score
best_match = option

if best_match_score >= 70:
return best_match
else:
return ""

If you want to learn more about the FuzzyWuzzy library and its functions — you can check out an article I wrote about it here.

Get ChatGPT Response

Once we have the transcription, we can send it over to ChatGPT to get a response.

For each ChatGPT request, we added a prompt asking for a short and funny response. We also told ChatGPT which figure to pretend to be.

So our function looked as follows:

def get_gpt_response(transcript: str, chosen_figure: str) -> str:
system_instructions = get_system_instructions(chosen_figure)
try:
return make_openai_request(
system_instructions=system_instructions,
user_question=transcript).choices[0].message["content"]
except Exception as e:
logging.error(f"could not get ChatGPT response. error: {str(e)}")
raise e

and the system instructions looked as follows:

def get_system_instructions(figure: str) -> str:
return f"You provide funny and short answers. You are: {figure}"

Text to Speech

For the text-to-speech part, we opted for a Python library called pyttsx3. This choice was not only straightforward to implement but also offered several additional advantages. It’s free of charge, provides two voice options — male and female — and allows you to select the speaking rate in words per minute (speech speed).

When a user starts the game, they pick a character from a predefined list of options. If we couldn’t find a match for what they said within our list, we’d randomly select a character from our “fallback figures” list. In both lists, each character was associated with a gender, so our text-to-speech function also received the voice ID corresponding to the selected gender.

This is what our text-to-speech function looked like:

def text_to_speech(text: str, gender: str = Gender.FEMALE.value) -> None:
engine = pyttsx3.init()

engine.setProperty("rate", WORDS_PER_MINUTE_RATE)
voices = engine.getProperty("voices")
voice_id = voices[0].id if gender == "male" else voices[1].id
engine.setProperty("voice", voice_id)

engine.say(text)
engine.runAndWait()

The Main Flow

Now that we’ve more or less got all the pieces of our app in place, it’s time to dive into the gameplay! The main flow is outlined below. You might notice some functions we haven’t delved into (e.g. choose_figureplay_round), but you can explore the full code by checking out the repo. Eventually, most of these higher-level functions tie into the internal functions we’ve covered above.

Here’s a snippet of the main game flow:

import asyncio

from src.handle_transcript import text_to_speech
from src.main_flow_helpers import choose_figure, start, play_round, \
is_another_round


def farewell() -> None:
farewell_message = "It was great having you here, " \
"hope to see you again soon!"
print(f"\n{farewell_message}")
text_to_speech(farewell_message)


async def get_round_settings(figure: str) -> dict:
new_round_choice = await is_another_round()
if new_round_choice == "new figure":
return {"figure": "", "another_round": True}
elif new_round_choice == "no":
return {"figure": "", "another_round": False}
elif new_round_choice == "yes":
return {"figure": figure, "another_round": True}


async def main():
start()
another_round = True
figure = ""

while True:
if not figure:
figure = await choose_figure()

while another_round:
await play_round(chosen_figure=figure)
user_choices = await get_round_settings(figure)
figure, another_round = \
user_choices.get("figure"), user_choices.get("another_round")
if not figure:
break

if another_round is False:
farewell()
break


if __name__ == "__main__":
asyncio.run(main())

The Roads Not Taken

We had several ideas in mind that we didn’t get to implement during the hackathon. This was either because we did not find an API we were satisfied with during that weekend, or due to the time constraints preventing us from developing certain features. These are the paths we didn’t take for this project:

Matching the Response Voice with the Chosen Figure’s “Actual” Voice

Imagine if the user chose to talk to Shrek, Trump, or Oprah Winfrey. We wanted our text-to-speech library or API to articulate responses using voices that matched the chosen figure. However, we couldn’t find a library or API during the hackathon that offered this feature at a reasonable cost. We’re still open to suggestions if you have any =)

Let the Users Talk to “Themselves”

Another intriguing idea was to prompt users to provide a vocal sample of themselves speaking. We would then train a model using this sample and have all the responses generated by ChatGPT read aloud in the user’s own voice. In this scenario, the user could choose the tone of the responses (affirmative and supportive, sarcastic, angry, etc.), but the voice would closely resemble that of the user. However, we couldn’t find an API that supported this within the constraints of the hackathon.

Adding a Frontend to Our Application

Our initial plan was to include a frontend component in our application. However, due to a last-minute change in the number of participants in our group, we decided to prioritize the backend development. As a result, the application currently runs on the command line interface (CLI) and doesn’t have frontend side.

Additional Improvements We Have In Mind

Latency is what bothers me most at the moment.

There are several components in the flow with a relatively high latency that in my opinion slightly harm the user experience. For example: the time it takes from finishing providing the audio input and receiving a transcription, and the time it takes since the user presses a button until the system actually starts recording the audio. So if the user starts talking right after pressing the key — there will be at least one second of audio that won’t be recorded due to this lag.

Link to the Repo & Credits

Want to see the whole project? It’s right here!

Also, warm credit goes to Lior Yardeni, my hackathon partner with whom I created this game.

Summing Up

In this article, we learned how to create a speech-to-text-to-speech game using Python, and intertwined it with AI. We’ve used the Whisper model by OpenAI for speech recognition, played around with the FuzzyWuzzy library for text matching, tapped into ChatGPT’s conversational magic via their developer API, and brought it all to life with pyttsx3 for text-to-speech. While OpenAI’s services (Whisper and ChatGPT for developers) do come with a modest cost, it’s budget-friendly.

We hope you’ve found this guide enlightening and that it’s motivating you to embark on your projects.

Cheers to coding and fun! 🚀